> ## Documentation Index
> Fetch the complete documentation index at: https://docs.omnifact.ai/llms.txt
> Use this file to discover all available pages before exploring further.

# Creating New Spaces

> Learn how to build custom AI assistants by creating Spaces tailored to your specific needs and workflows

export const Glossary = ({children, term}) => {
  const glossaryDefinitions = {
    'ai': 'Artificial Intelligence - computer systems that can perform tasks typically requiring human intelligence',
    'artificial-intelligence-ai': 'Computer systems that can perform tasks typically requiring human intelligence',
    'ai-assistant': 'An AI system designed to help users with tasks through conversation',
    'space': 'A dedicated environment with a specialized AI assistant and optional Uploaded Files',
    'spaces': 'Dedicated environments with specialized AI assistants and optional Uploaded Files',
    'knowledge': 'The sub-menu in Space settings where you manage Uploaded Files and Connected Sources',
    'uploaded-files': 'Documents manually uploaded to a Space under the Knowledge tab',
    'prompt': 'Instructions or questions you give to an AI assistant',
    'response': 'The AI assistant\'s answer to your prompt or question',
    'query': 'A question or request for information',
    'context': 'Background information that helps the AI understand your request',
    'llm': 'Large Language Model - an AI system trained on vast amounts of text data to understand and generate human language',
    'large-language-model-llm': 'An AI system trained on vast amounts of text data to understand and generate human language',
    'privacy-filter': 'A system that automatically detects and masks sensitive information before it reaches AI models, and restricts images from being sent to non-EU hosted models for compliance',
    'chat-instructions': 'Custom guidelines that define how an AI assistant behaves and responds in a Space',
    'pattern-matching': 'The process by which AI recognizes and uses patterns in data to provide responses',
    'patterns': 'Recognizable structures or trends in data that AI systems can identify and use',
    'training-data': 'The text and information used to teach an AI system how to understand and respond to requests',
    'natural-language': 'Everyday human language that people use to communicate, as opposed to computer code or formal syntax',
    'hallucination': 'When an AI generates information that sounds plausible but is actually incorrect or fabricated',
    'filtering': 'The process of automatically detecting and temporarily replacing sensitive information to protect it during AI processing',
    'masking': 'Temporarily replacing sensitive information with generic labels to protect it from being seen by external AI models',
    're-insertion': 'The automatic process of putting original sensitive information back into AI responses after they\'ve been generated with filtered data',
    'retrieval': 'The process of finding and accessing relevant documents from Uploaded Files to answer questions',
    'hosting': 'Where an AI model is deployed and made available for use - either by third-party providers, on your organization\'s own servers, or in private cloud environments',
    'cite': 'To reference or mention the source of information, helping you know where an AI\'s answer came from',
    'sidebar': 'A panel that appears on the side of the screen showing additional information and options',
    'toggle': 'A button or control that switches something on or off, like opening and closing a sidebar',
    'navigation': 'The system of menus and buttons that help you move between different parts of Omnifact',
    'favoriting': 'Marking a Space as a favorite to pin it to the main navigation for quick access',
    'pinning': 'Attaching a Space to the main navigation bar so it\'s always visible and easily accessible'
  };
  const definition = glossaryDefinitions[term];
  return <Tooltip tip={definition}>{children}</Tooltip>;
};

Creating a new Space allows you to build a custom <Glossary term="ai-assistant">AI assistant</Glossary> tailored to your specific topics, projects, and teams. This guide will walk you through the process of setting up a Space with the right configuration to ensure it best serves your needs.

<Frame>
  <img className="block" src="https://mintcdn.com/omnifact/RJYedpBP8SoQfcMz/images/spaces-home.png?fit=max&auto=format&n=RJYedpBP8SoQfcMz&q=85&s=1d7a2550c995c92ad66bc51910618e34" alt="Spaces Home" width="1133" height="694" data-path="images/spaces-home.png" />
</Frame>

## Why Create a New Space?

Before creating a Space, it's helpful to understand the key benefits and use cases:

<CardGroup cols={2}>
  <Card title="Custom AI Assistants" icon="robot">
    Create specialized AI assistants with personalities, areas of expertise, and behaviors tailored to specific domains or tasks.
  </Card>

  <Card title="Content Organization" icon="folder-tree">
    Organize related AI interactions and knowledge resources around a specific topic, project, or function.
  </Card>

  <Card title="Team Collaboration" icon="users">
    Build a shared AI environment where team members can collaborate with consistent AI interactions.
  </Card>

  <Card title="Domain-Specific Uploaded Files" icon="brain">
    Leverage your organization's proprietary documents through the Uploaded Files.
  </Card>
</CardGroup>

## Creating a New Space: Step-by-Step

<Steps>
  <Step title="Access the 'Your Spaces' page">
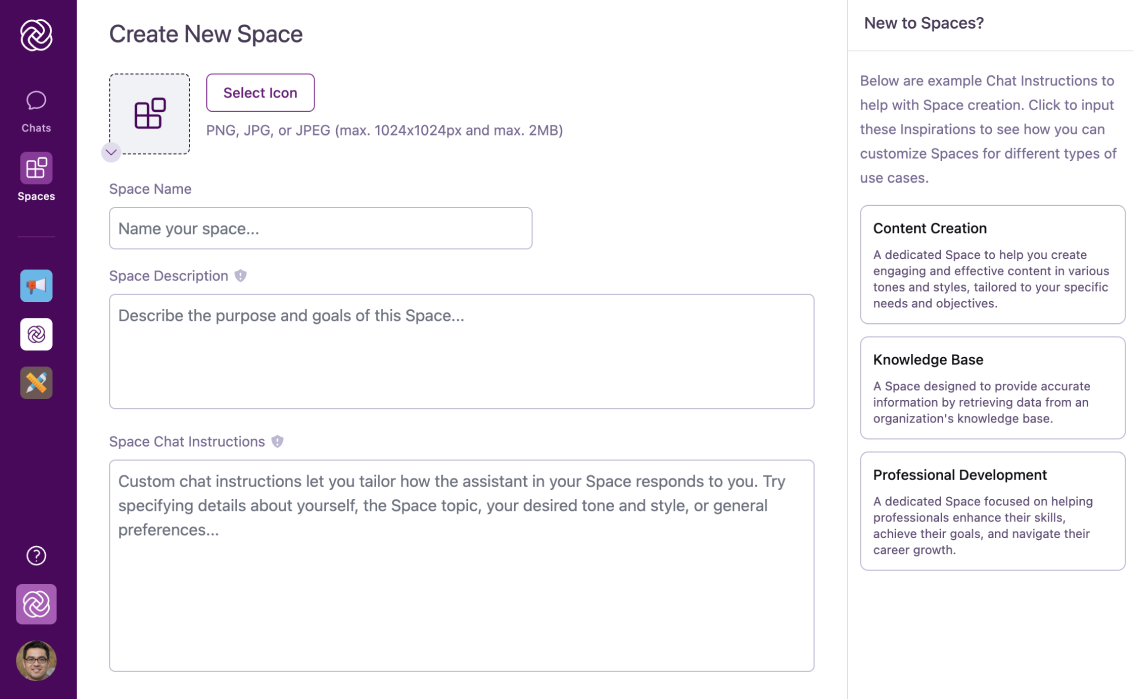
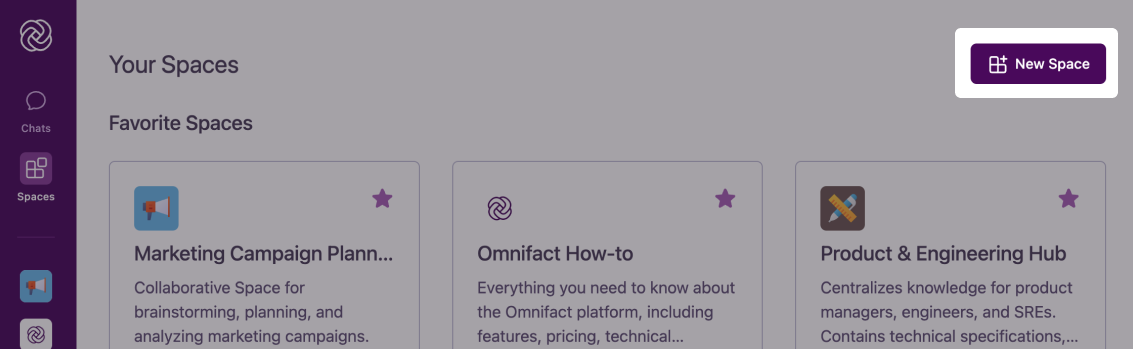
    Click on the **"Spaces"** icon in the main navigation bar on the left side of the screen to access the "Your Spaces" page.

    <Note>
      This is the central hub for managing all Spaces you have access to.
    </Note>
  </Step>

  <Step title="Start the creation process">
    Click the **"New Space"** button located at the top right of the "Your Spaces" page.

    <Frame>
      <img className="block" src="https://mintcdn.com/omnifact/zaTitZHbFuJaSr6u/images/create-space-button.png?fit=max&auto=format&n=zaTitZHbFuJaSr6u&q=85&s=4d9a225abfcb024e95306790b2240936" alt="Creating a new Space in Omnifact" width="1133" height="349" data-path="images/create-space-button.png" />
    </Frame>

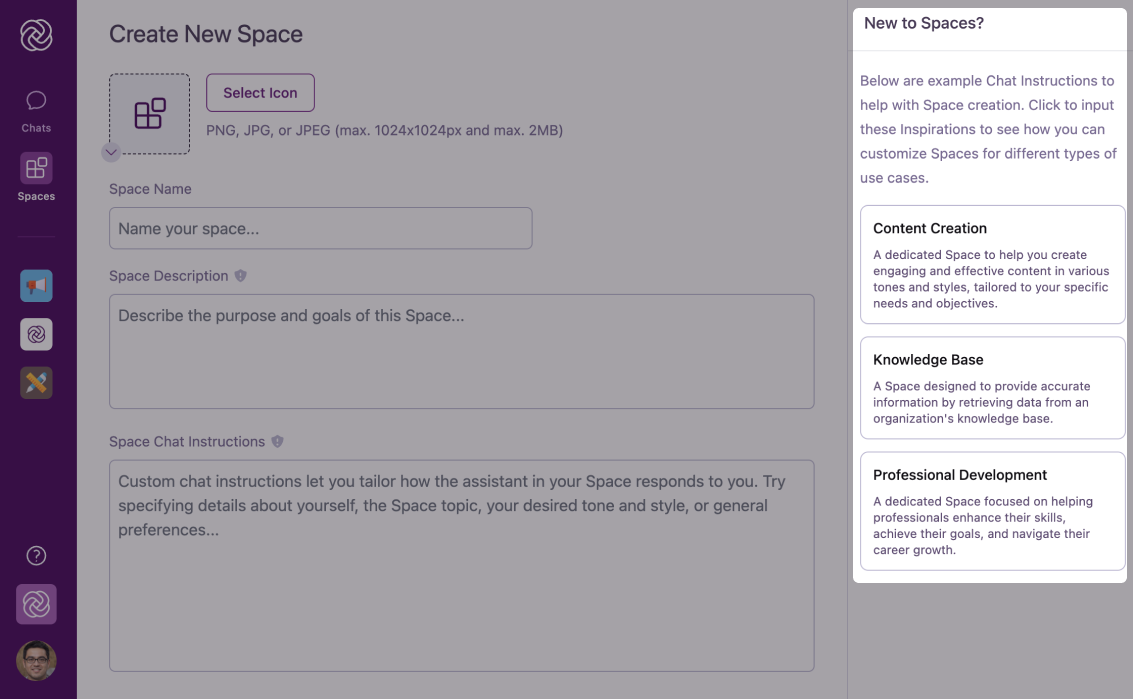
    This will open the "Create New Space" interface where you'll configure your new Space.

    <Frame>
      <img className="block" src="https://mintcdn.com/omnifact/zaTitZHbFuJaSr6u/images/create-new-space.png?fit=max&auto=format&n=zaTitZHbFuJaSr6u&q=85&s=fafa8f71d4dda89977de4fbb8218d0e4" alt="Create New Space UI" width="1133" height="699" data-path="images/create-new-space.png" />
    </Frame>
  </Step>

  <Step title="Consider Space Starters (Optional)">
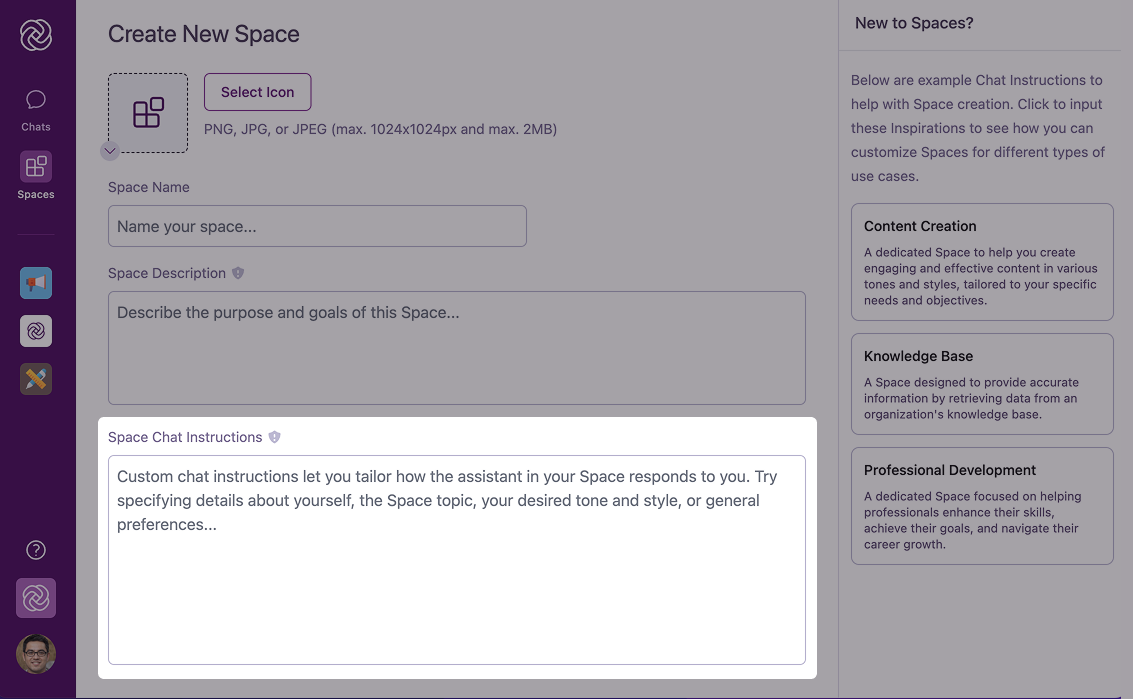
    Space Starter templates appear in a sidebar within the creation interface.

    <Frame>
      <img className="block" src="https://mintcdn.com/omnifact/RJYedpBP8SoQfcMz/images/space-starters.png?fit=max&auto=format&n=RJYedpBP8SoQfcMz&q=85&s=1b5abe613a8b87d35b2e5b0c33f80e03" alt="Space Starters" width="1133" height="699" data-path="images/space-starters.png" />
    </Frame>

    These pre-configured templates are designed for common use cases:

    <CardGroup cols={3}>
      <Card title="Content Creation" icon="pencil">
        Optimized for brainstorming and generating various types of content.
      </Card>

      <Card title="Uploaded Files" icon="book-open">
        Designed for question answering and information retrieval from documents.
      </Card>

      <Card title="Professional Development" icon="graduation-cap">
        Tailored for learning, skill enhancement, and career guidance.
      </Card>
    </CardGroup>

    <Note>
      You can click a Space Starter to pre-populate the creation form with template settings, or simply ignore them and configure your Space from scratch using the empty form.
    </Note>

    <Tip>
      Space Starters can save time if they align with your intended use case, but creating from scratch gives you complete control over your Space configuration.
    </Tip>
  </Step>

  <Step title="Configure Space basics">
    Fill out the core information that identifies your Space:

    <Accordion title="Space Icon" defaultOpen={true}>
      Click **"Select icon"** to choose a visual representation for your Space:

      * Browse the popup icon library for a suitable option
      * Or upload a custom icon (PNG, JPEG, WebP, HEIC/HEIF, AVIF, BMP, GIF, ICO, SVG, or TIFF format)

      <Tip>
        Choose an icon that visually represents the Space's purpose to make it easily recognizable.
      </Tip>
    </Accordion>

    <Accordion title="Space Name">
      Enter a clear, descriptive name for your Space in the **"Space Name"** field.

      <Check>
        Use specific, descriptive names like "Marketing Campaign Planning" or "Technical Support Uploaded Files" rather than generic names like "Work Space" or "Team Space."
      </Check>
    </Accordion>

    <Accordion title="Space Description">
      Provide a brief explanation of the Space's purpose in the **"Space Description"** field.

      <Note>
        While optional, a good description helps users understand what the Space is for and when to use it. The AI assistant will also use this description to understand the Space's purpose.
      </Note>
    </Accordion>
  </Step>

  <Step title="Define Space Chat Instructions">
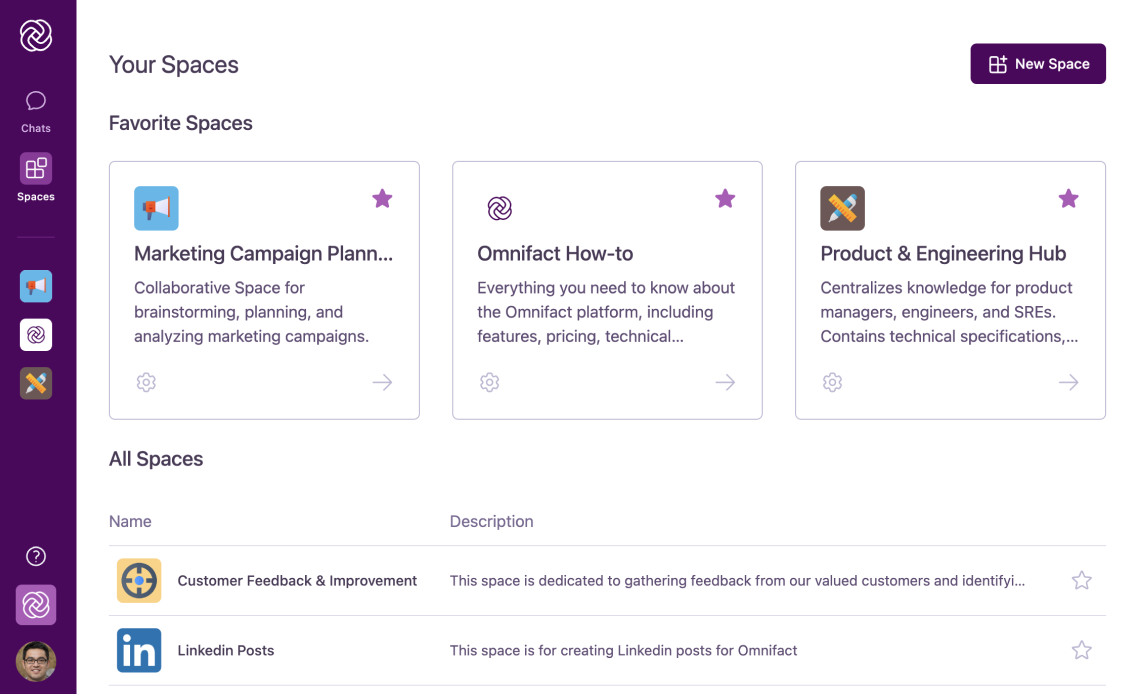
    This is the most important step in creating a truly custom AI assistant. The **"Space <Glossary term="chat-instructions">Chat Instructions</Glossary>"** define how your Space's AI assistant will behave.

    <Frame>
      <img className="block" src="https://mintcdn.com/omnifact/RJYedpBP8SoQfcMz/images/space-instructions-field.png?fit=max&auto=format&n=RJYedpBP8SoQfcMz&q=85&s=e2cd8e392de953130b968c2c643e2839" alt="Space Chat Instructions field" width="1133" height="699" data-path="images/space-instructions-field.png" />
    </Frame>

    <Accordion title="What to include in Instructions" defaultOpen={true}>
      Effective Space Instructions typically define:

      * **The AI's role and expertise:** What is the AI an expert in? (e.g., "You are an experienced marketing strategist specialized in digital campaigns")
      * **Tone and style:** How should the AI communicate? (e.g., "Use a friendly, collaborative tone but maintain professional language")
      * **Focus areas:** What specific knowledge domains should the AI emphasize? (e.g., "Focus particularly on SEO best practices and social media strategy")
      * **Response format preferences:** How should information be structured? (e.g., "Present analysis in bullet points when possible")
      * **Contextual considerations:** Any special organizational context the AI should consider (e.g., "Our company targets enterprise B2B clients primarily")
    </Accordion>

    <Tip>
      The more specific your instructions, the more tailored your Space AI assistant will be. Think of these instructions as defining the AI's personality and expertise.
    </Tip>
  </Step>

  <Step title="Add Example Prompts">
    Add suggested prompts to guide users on effectively interacting with this Space's AI assistant.

    <Accordion title="Creating Effective Example Prompts">
      * Start with a few clear examples (3-5) that showcase the Space's purpose
      * Make prompts specific and actionable rather than vague
      * Include diverse examples that demonstrate different capabilities
      * Use the **"+ Add Additional Prompt"** button to add more examples

      <Check>
        Good example: "Analyze our Q2 marketing campaign results and suggest improvements for Q3"
      </Check>

      <Warning>
        Avoid vague examples like "Help with marketing" - they don't demonstrate the Space's value
      </Warning>
    </Accordion>
  </Step>

  <Step title="Finalize Space creation">
    Once you've configured all settings to your satisfaction:

    * Review your configuration to ensure everything is correct
    * Click the **"Create Space"** button at the bottom of the page

    <Note>
      If you need to abandon the creation process, you can click "Cancel Creation" to return to the Spaces interface without creating a new Space.
    </Note>
  </Step>
</Steps>

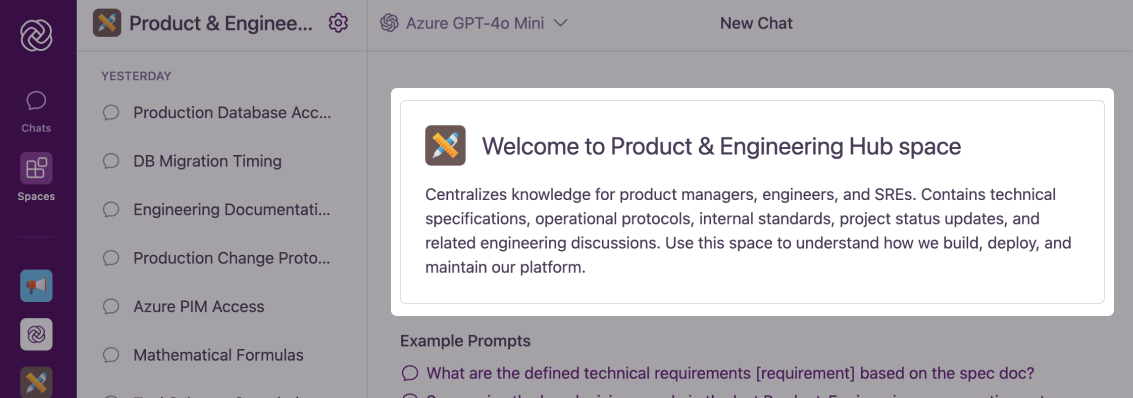
After clicking "Create Space," you'll be immediately taken to your newly created Space, which will be ready to use. The Space will initially have an empty chat with a welcome message and your example prompts.

<Frame>
  <img className="block" src="https://mintcdn.com/omnifact/RJYedpBP8SoQfcMz/images/new-space-welcome.png?fit=max&auto=format&n=RJYedpBP8SoQfcMz&q=85&s=b01bb08581245c1268cb681cc9f9d25e" alt="Welcome message in a newly created Space" width="1133" height="398" data-path="images/new-space-welcome.png" />
</Frame>

## Example: Creating a Marketing Campaign Space

<Accordion title="Practical example of Space creation">
  Let's walk through creating a Space for marketing campaign planning:

  1. **Space Name:** "Marketing Campaign Planning"
  2. **Space Icon:** Select a megaphone or chart icon from the library
  3. **Space Description:** "Collaborative Space for brainstorming, planning, and analyzing marketing campaigns."
  4. **Space Chat Instructions:**

       <div className="border px-6 py-px rounded-lg">
         You are an experienced marketing strategist with expertise in digital campaign planning.
         Provide creative, data-driven advice on marketing campaign development, execution, and analysis.
         Emphasize current best practices in digital marketing, including social media, email campaigns,
         and content marketing.

         When discussing marketing strategies, consider:

         * Our target audience of mid-sized businesses
         * Budget efficiency and ROI focus
         * Integration across marketing channels
         * Performance measurement and KPIs

         Present analysis in a structured format with clear action items when appropriate.
         Maintain a collaborative, encouraging tone while providing specific, actionable advice.
       </div>
  5. **Example Prompts:**
     * "Help me brainstorm creative concepts for a \[product/service] launch campaign"
     * "What are the key metrics and KPIs I should track for a \[campaign type] campaign?"
     * "Review my campaign performance data and suggest optimization strategies"
     * "Help me develop a content strategy and calendar for our marketing channels"
</Accordion>

## Best Practices for Creating Effective Spaces
<CardGroup cols={2}>
  <Card title="Purpose-Driven Design" icon="bullseye">
    Create each Space with a specific purpose in mind. Focused Spaces with clear objectives deliver better results than generic ones.
  </Card>

  <Card title="Detailed Instructions" icon="list-check">
    Invest time in crafting thorough Space Instructions. The more guidance you provide, the more effective your custom AI assistant will be.
  </Card>

  <Card title="Strategic Naming" icon="tag">
    Use clear, descriptive names that instantly communicate the Space's purpose to users browsing available Spaces.
  </Card>

  <Card title="Thoughtful Example Prompts" icon="lightbulb">
    Craft example prompts that showcase the Space's capabilities and guide users toward effective interactions.
  </Card>
</CardGroup>

## After Creating Your Space

Once your Space is created, you have several options to enhance it further:

<AccordionGroup>
  <Accordion title="Add Uploaded Files Documents" icon="file-circle-plus" defaultOpen={true}>
    Upload relevant documents to create a specialized knowledge foundation for your Space's AI assistant.

    **Benefits:**

    * Provides context-specific information to your AI assistant
    * Enables responses based on your organization's proprietary information
    * Improves accuracy for domain-specific questions

    <Tip>
      Focus on high-quality, relevant documents rather than quantity. Each document should directly relate to the Space's purpose.
    </Tip>

    [Learn more about Managing Uploaded Files →](/en/platform/core-features/spaces/managing-uploaded-files)
  </Accordion>

  <Accordion title="Invite Team Members" icon="user-plus">
    Share your Space with colleagues who would benefit from its specialized AI assistant.

    **Collaboration benefits:**

    * Creates a shared AI environment for team members
    * Ensures everyone has access to the same information and AI capabilities
    * Facilitates knowledge sharing and consistent AI interactions

    <Note>
      As the Space creator, you can assign different roles (Admin or Member) to control access levels for other team members added to the Space.
    </Note>

    [Learn more about Sharing Spaces with Colleagues →](/en/platform/core-features/spaces/sharing-spaces)
  </Accordion>

  <Accordion title="Refine Space Instructions" icon="sliders">
    After using your Space for a while, you may want to fine-tune the Space Instructions.

    **Why refine instructions:**

    * Improve the relevance and specificity of AI responses
    * Adapt the AI's behavior based on real-world usage patterns
    * Add new focus areas or capabilities as your needs evolve

    To refine instructions, access Space Settings via the cog icon in the Space header, then navigate to the "Space Details" tab.

    [Learn more about Customizing Spaces →](/en/platform/core-features/spaces/customizing-spaces)
  </Accordion>

  <Accordion title="Favorite Your Space" icon="star">
    Mark your new Space as a favorite to pin it to the main navigation bar for quick access from anywhere in Omnifact.

    **How to favorite a Space:**

    1. Find your Space in the "Your Spaces" page
    2. Click the star icon next to the Space name
    3. Verify that the Space now appears in the main navigation bar

    This is especially useful for Spaces you'll use frequently.
  </Accordion>
</AccordionGroup>

## Common Questions

<AccordionGroup>
  <Accordion title="How many Spaces can I create?">
    The number of Spaces you can create depends on your organization's Omnifact plan. Contact your administrator if you're unsure about your limits.
  </Accordion>

  <Accordion title="Can I edit a Space after creating it?">
    Yes! Space administrators can edit all aspects of a Space after creation through the Space Settings. This includes changing the name, description, icon, Space Instructions, and example prompts.
  </Accordion>

  <Accordion title="Do I need to add documents to my Space immediately?">
    No, document upload is optional and can be done at any time after Space creation. Spaces can function effectively with just well-crafted Space Instructions, even without Uploaded Files.
  </Accordion>

  <Accordion title="Who can see the Spaces I create?">
    By default, new Spaces are visible only to you until you explicitly share them with other users. You control who has access through Space member management.
  </Accordion>
</AccordionGroup>

## Next Steps

Now that you've created your Space, you might want to explore:

* [Customizing Spaces](/en/platform/core-features/spaces/customizing-spaces) to tailor them after creation
* How [Managing Uploaded Files](/en/platform/core-features/spaces/managing-uploaded-files) works
* Giving access by [Sharing Spaces with Colleagues](/en/platform/core-features/spaces/sharing-spaces)