> ## Documentation Index
> Fetch the complete documentation index at: https://docs.omnifact.ai/llms.txt
> Use this file to discover all available pages before exploring further.
# Published Spaces
> Enable and manage API access to your Omnifact Spaces for secure integration with external applications.
## Spaces as APIs
Turn any [Space](/en/platform/core-features/spaces/introduction) into a powerful API endpoint. **Published Spaces** allow you to integrate your specialized AI assistants into websites, Slack bots, or internal tools with just a few clicks.
This is an advanced feature that is not enabled by default. If you are interested in using Published Spaces, please contact our support team at [support@omnifact.ai](mailto:support@omnifact.ai) to have it activated for your organization.
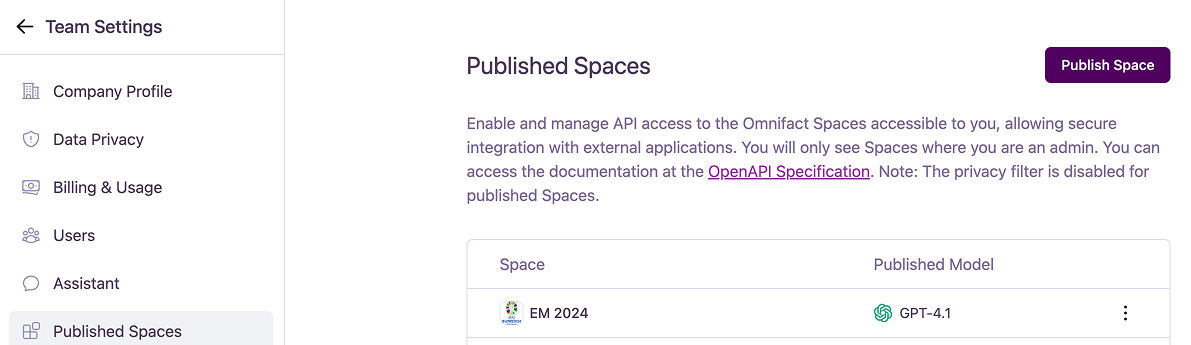
Once enabled, you can manage your endpoints from the **Published Spaces** tab in your **Team Settings**.
 ### Publishing a New Space
To create a new API endpoint, follow these steps:
Click the **"Publish Space"** button at the top right of the page.
In the "Publish Space" dialog:
1. Choose the **Space** you want to create an endpoint for from the dropdown menu.
2. Select a specific **Model** that will power this endpoint. You can change the model later if needed.
### Publishing a New Space
To create a new API endpoint, follow these steps:
Click the **"Publish Space"** button at the top right of the page.
In the "Publish Space" dialog:
1. Choose the **Space** you want to create an endpoint for from the dropdown menu.
2. Select a specific **Model** that will power this endpoint. You can change the model later if needed.
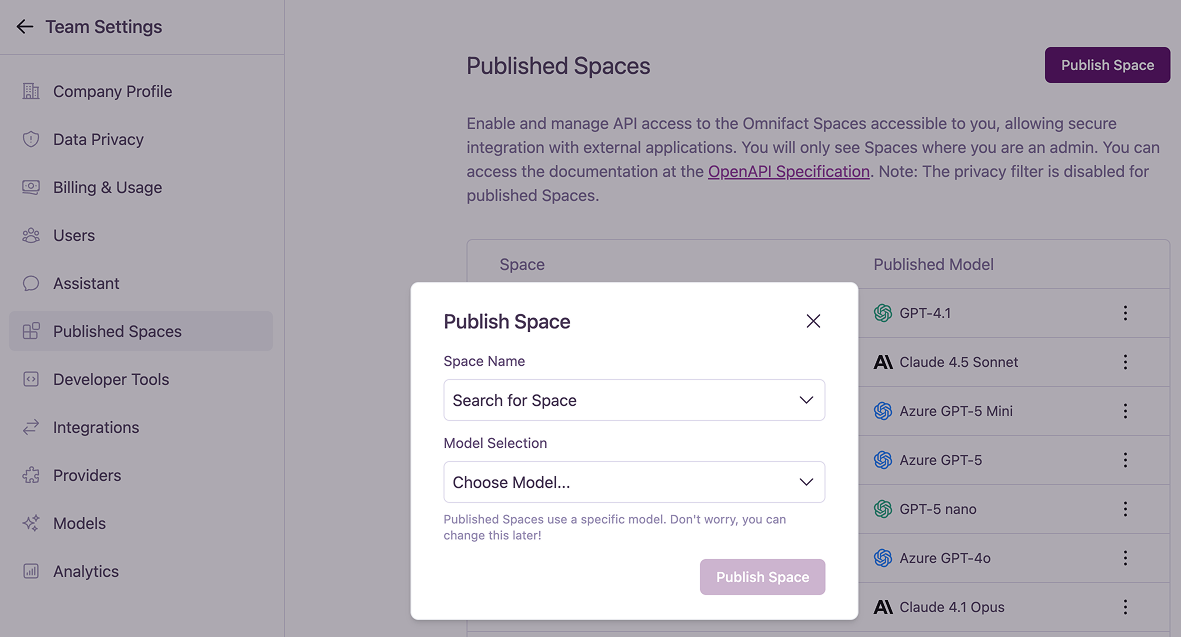 Click the **"Publish Space"** button to create the endpoint. Your new Published Space will now appear in the list.
### Managing Published Spaces
The main dashboard lists all your currently published Spaces. For each one, you can click the **"..."** (more options) menu to manage it.
* **Edit:** Opens a dialog to modify the Published Space. Here you can change the model selection or view and copy the API endpoint URL.
* **Copy Endpoint URL:** Instantly copies the unique API endpoint to your clipboard.
* **Unpublish:** Permanently deletes the API endpoint and revokes access. This action cannot be undone.
### Model Availability Errors
If the AI model assigned to a Published Space becomes unavailable (for example, if it was disabled in [Model Management](/en/platform/team-administration/models)), a warning icon will appear next to it.
To fix this, you must **Edit** the Published Space and select a new, available model from the dropdown.
### Security and API Documentation
**Important Security Considerations:**
* **Privacy Filter Disabled:** The [Omnifact Privacy Filter](/en/platform/core-features/privacy-security/introduction) is automatically **disabled** for all interactions with a Published Space via its API endpoint. Any data sent to the endpoint is passed directly to the AI model.
* **Secure Your Endpoint:** The API Endpoint URL is a secret. Do not share it publicly or commit it to version control systems. Treat it like a password or an API key.
### Inline Sources in the Public API
Developers building custom integrations can also take advantage of [inline source citations](/en/platform/team-administration/groups#group-permissions) when this capability is enabled for your team. By setting the `omnifact-enable-inline-sources` header to `true`, the Public API will include inline sources in its streaming and non-streaming responses and provide detailed message source events, giving you the same clear attribution in your custom applications.
**Inline Sources** must be enabled in **Team Settings** > **Groups** before the `omnifact-enable-inline-sources` header will have any effect.
For technical details on how to integrate with the API, refer to the [**OpenAPI Specification**](https://connect.omnifact.ai/docs) linked at the top of the Published Spaces page.
Click the **"Publish Space"** button to create the endpoint. Your new Published Space will now appear in the list.
### Managing Published Spaces
The main dashboard lists all your currently published Spaces. For each one, you can click the **"..."** (more options) menu to manage it.
* **Edit:** Opens a dialog to modify the Published Space. Here you can change the model selection or view and copy the API endpoint URL.
* **Copy Endpoint URL:** Instantly copies the unique API endpoint to your clipboard.
* **Unpublish:** Permanently deletes the API endpoint and revokes access. This action cannot be undone.
### Model Availability Errors
If the AI model assigned to a Published Space becomes unavailable (for example, if it was disabled in [Model Management](/en/platform/team-administration/models)), a warning icon will appear next to it.
To fix this, you must **Edit** the Published Space and select a new, available model from the dropdown.
### Security and API Documentation
**Important Security Considerations:**
* **Privacy Filter Disabled:** The [Omnifact Privacy Filter](/en/platform/core-features/privacy-security/introduction) is automatically **disabled** for all interactions with a Published Space via its API endpoint. Any data sent to the endpoint is passed directly to the AI model.
* **Secure Your Endpoint:** The API Endpoint URL is a secret. Do not share it publicly or commit it to version control systems. Treat it like a password or an API key.
### Inline Sources in the Public API
Developers building custom integrations can also take advantage of [inline source citations](/en/platform/team-administration/groups#group-permissions) when this capability is enabled for your team. By setting the `omnifact-enable-inline-sources` header to `true`, the Public API will include inline sources in its streaming and non-streaming responses and provide detailed message source events, giving you the same clear attribution in your custom applications.
**Inline Sources** must be enabled in **Team Settings** > **Groups** before the `omnifact-enable-inline-sources` header will have any effect.
For technical details on how to integrate with the API, refer to the [**OpenAPI Specification**](https://connect.omnifact.ai/docs) linked at the top of the Published Spaces page.