

Unlock Team Collaboration
Sharing a Space transforms it from a personal tool into a powerful team asset. Why share?- Unified Uploaded Files: Ensure everyone on your team gets answers from the same source of truth (your Uploaded Files).
- Consistent Guidance: Give your entire team access to an agent that follows the same instructions and tone.
- Faster Onboarding: New team members can instantly access the collective knowledge and tools they need.
Understanding Space Roles
Before sharing a Space, it’s important to understand the different roles available:- Admin
- Member
- Full control over Space settings
- Can add/remove members
- Can modify Space Details and Instructions
- Can manage Uploaded Files
- Can grant/revoke admin access
When you create a Space, you automatically become its admin. Choose carefully when granting admin privileges to others, as admins have full control over the Space.
Managing Space Sharing
Viewing the Sharing List
1
Access Space Settings
Open the Space Settings through either:
- The cog icon in the Space Header
- The “Space Settings” button in the Space Details sidebar
2
Navigate to Sharing Tab
Click on the “Sharing” tab in the Space Settings interface to view users and groups that have access.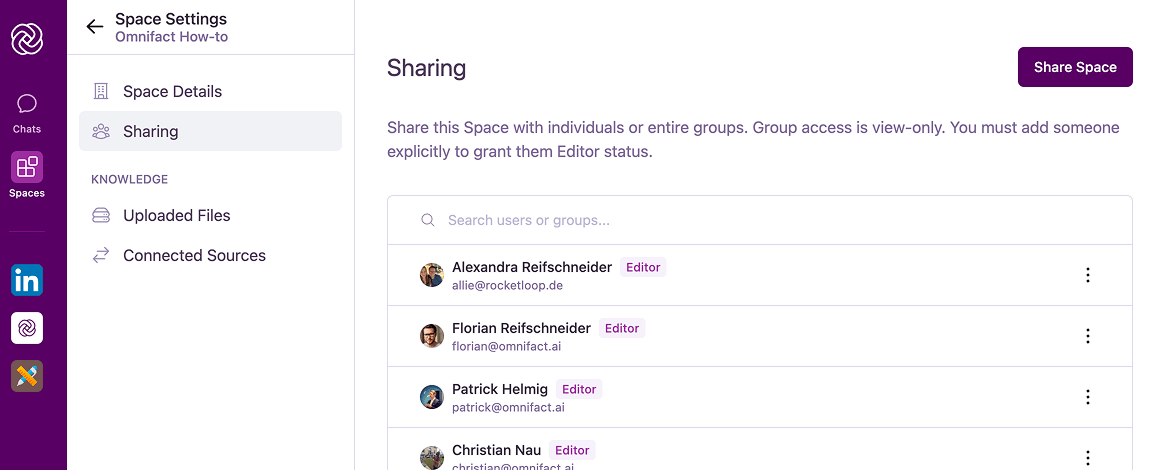
Sharing with Users and Groups
You can share your Space with individual colleagues or entire Groups.1
Open Share Space Dialog
Click the Share Space button in the Sharing tab.
2
Search for Users or Groups
Use the search field to find individual colleagues or organization groups (like the “Everyone” group or specific departments).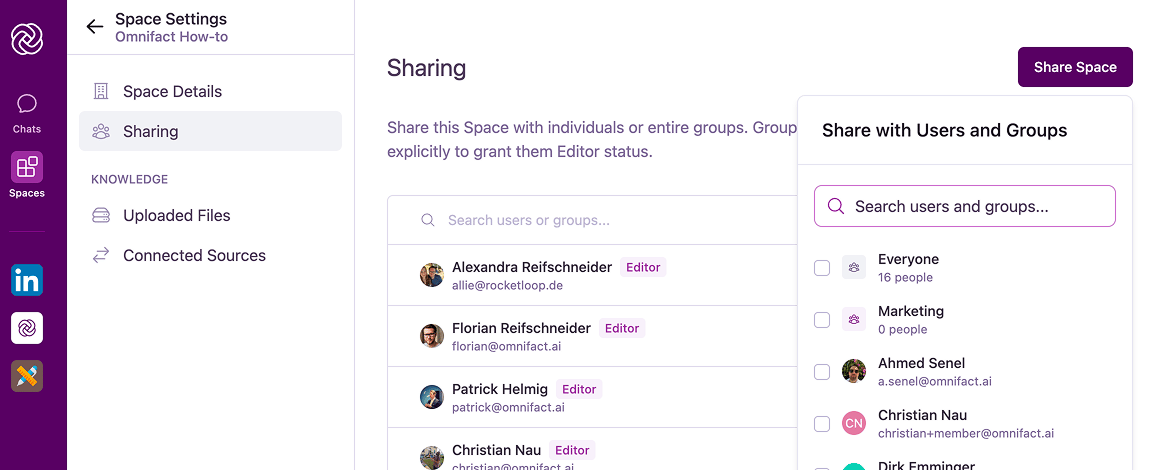
You can only share with users and groups that are part of your organization’s Omnifact instance.
3
Select and Confirm
Click the “Add” button next to each user or group you want to include. They will immediately gain access to the Space.
Managing Access and Editor Roles
To change a member’s role or remove them from the Space:1
Locate User or Group
Find the user or group in the list within the Sharing tab.
2
Access Options Menu
Click the More Options menu (three dots) next to the name.
3
Choose Action
Select from available options:
- “Grant edit access” (Users only) - Promotes the user to Editor/Admin role.
- “Revoke edit access” (Users only) - Removes Editor privileges.
- “Remove from Space” - Revokes access entirely.
When removing access, the user will lose access to the Space immediately, but their past contributions to the Space will remain.
Use Cases for Shared Spaces
Shared Spaces are particularly valuable for:Project Teams
Project Teams
Create a dedicated Space for project team members to:
- Access project documentation through the Uploaded Files
- Get consistent AI assistance for project-related questions
- Maintain alignment on project goals and requirements
Departmental Uploaded Files Sharing
Departmental Uploaded Files Sharing
Set up department-specific Spaces to:
- Share best practices and standard procedures
- Provide specialized AI support for department-specific tasks
- Maintain a central repository of department documentation
Cross-Functional Collaboration
Cross-Functional Collaboration
Foster collaboration across teams with Spaces that:
- Bridge knowledge gaps between different functions
- Provide consistent information to all stakeholders
- Create a shared understanding of cross-functional initiatives
Employee Onboarding
Employee Onboarding
Create an onboarding Space to help new employees get up to speed quickly:
- Upload company handbooks, policies, and procedures to the Uploaded Files
- Provide instant answers to common new hire questions
- Share organizational structure and team information
- Guide new employees through standard onboarding processes
- Maintain consistent onboarding experience across the organization
Best Practices for Shared Spaces
Clear Purpose
Define and communicate the Space’s purpose clearly to all members to ensure effective utilization.
Regular Maintenance
Periodically review member access and remove those who no longer need it.
Uploaded Files Management
Keep the Uploaded Files organized and up-to-date to maximize value for all members.
Role Assignment
Be selective with admin privileges, granting them only to those who need to manage the Space.
Common Questions
What happens to existing conversations when I add new members?
What happens to existing conversations when I add new members?
Each member can only see their own conversations with the agent. Conversations are private and not visible to other members of the Space.
Can I transfer Space ownership?
Can I transfer Space ownership?
Spaces don’t have a single owner - instead, they can have multiple admins. Any admin can manage the Space equally, including adding or removing other admins.
What happens when I remove a member?
What happens when I remove a member?
Removed members immediately lose access to the Space but their past conversations remain in their own Space’s history so they can be re-accessed later if needed.
How many members can I add to a Space?
How many members can I add to a Space?
The number of members you can add to a Space depends on your organization’s Omnifact plan. Contact your administrator if you need to confirm your limits.
Next Steps
Now that you know how to share Spaces with colleagues, you might want to explore:- Managing Uploaded Files to provide valuable resources for your team
- Customizing Spaces to better suit your team’s needs
- Uploaded Files Retrieval to understand how your team can leverage shared documents