

Understanding Groups
Groups act as an organizational layer to simplify user and permission management. They are designed around an additive permission model.Additive Permissions & Overlapping Groups
A user receives the union of all capabilities granted by every group they belong to. Groups can only add permissions; they never restrict or deny access granted elsewhere. Because of this, it is perfectly normal and expected for users to belong to multiple, overlapping groups. Example 1: Feature Access If the Everyone group grants access to “Upload files” but not “Generate images”, and the Designers group grants access to “Generate images”, a user belonging to both groups will be able to both upload files and generate images. The “Generate images” permission from the Designers group adds to their baseline permissions. Example 2: Privacy Filter Exemption If a user belongs to a Support group (which does not have the Privacy Filter Exemption enabled) and also belongs to a Legal group (which does have the Privacy Filter Exemption enabled), the user will be able to use the exemption. The lack of permission in the Support group does not override or cancel out the permission granted by the Legal group. Overlapping groups simply combine their access.Bulk Space Sharing
Instead of inviting users to a Space one by one, you can share a Space with an entire group.Types of Groups
There are three kinds of groups within Omnifact:- Everyone (Built-in) This group is automatically created for every organization and cannot be deleted. It implicitly includes every active user. The permissions assigned to the Everyone group define your organization’s baseline access.
- Synced Groups These groups are automatically provisioned and updated via your Identity Provider (SCIM). While you cannot manually add or remove members from Synced groups in Omnifact, you can manage their Omnifact permissions.
- Manual Groups These are custom groups you create directly within Omnifact. You have full control over their names, membership, and permissions.
SCIM Synchronization & Identity Providers
SCIM Provisioning is an exclusive feature available for customers on the Enterprise Plan.
- Groups from your directory are automatically mirrored into Omnifact as Synced Groups.
- User membership is automatically updated as people join, move, or leave your company.
- You map specific Omnifact permissions to these Synced Groups. For example, your “Data Science” IdP group can be granted access to Premium models without requiring any manual setup in Omnifact.
Managing Manual Groups
1
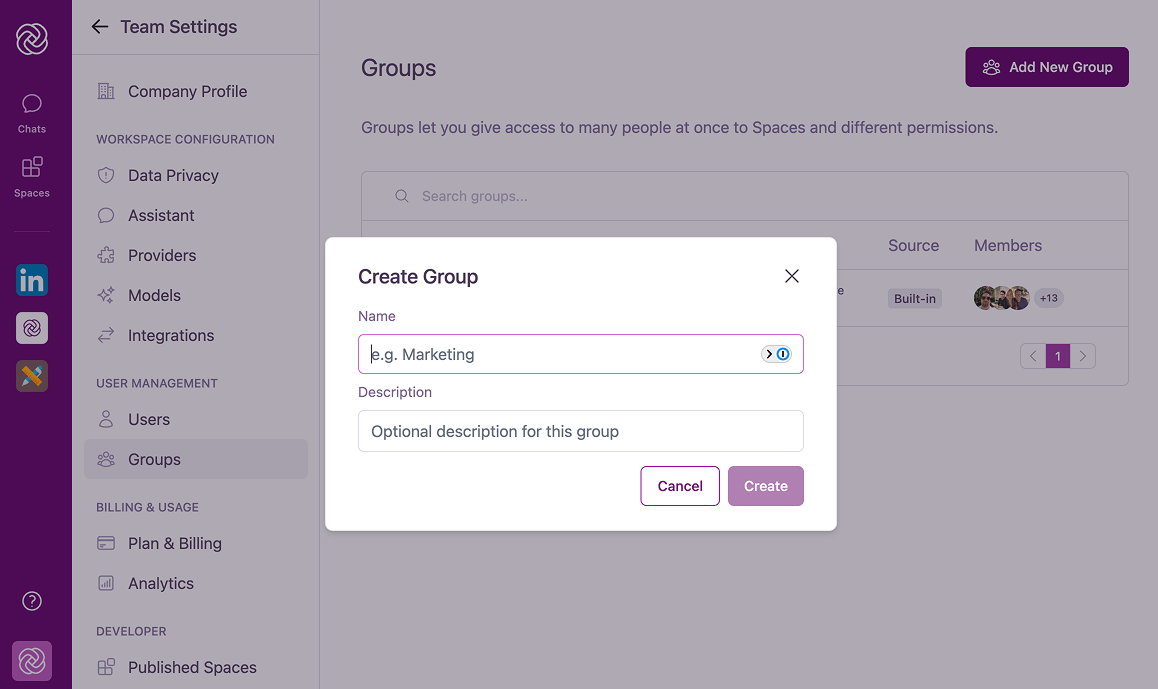
Create a Group
- Navigate to Team Settings > Groups.
- Click the Add New Group button.
- Enter a Name (required) and a Description (optional).
- Click Create.
2
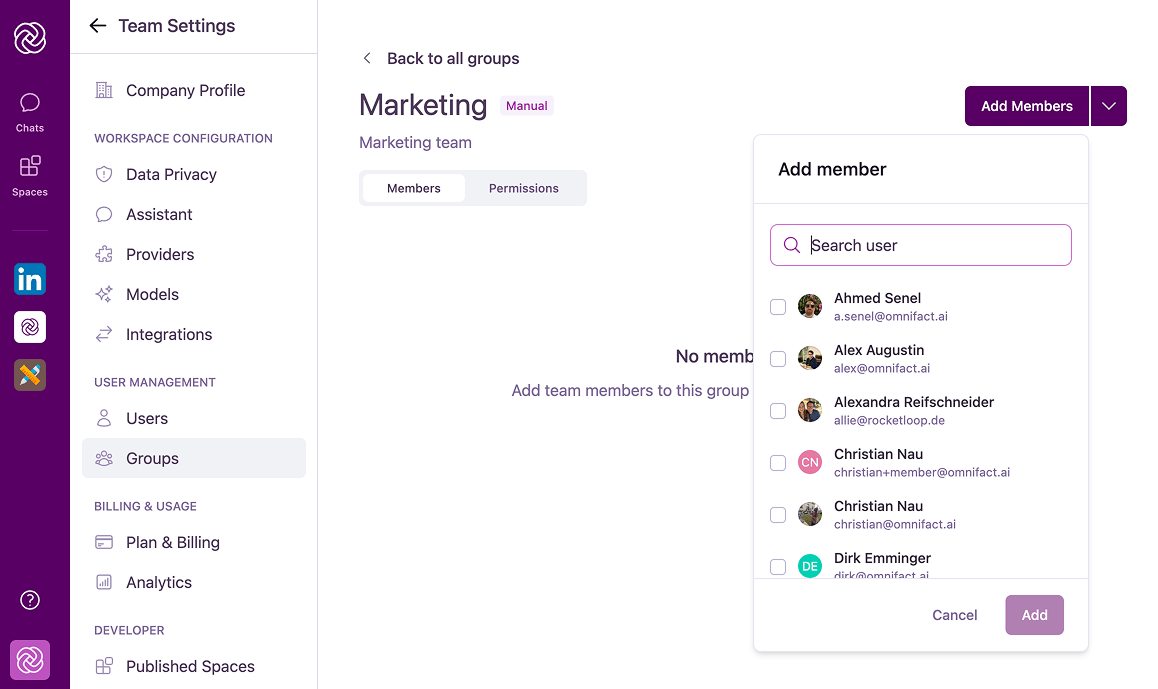
Add Members
- Click on your newly created group to open its details.
- Under the Members tab, click Add Members.
- Search for existing organization users and click Add.
3
Edit or Delete
You can rename or delete manual groups at any time using the “More Options” menu in the group details view. Deleting a group will immediately revoke any permissions and Space access that members received exclusively through that group.
Group Permissions
Permissions are managed in the Permissions tab of any group’s detail page. Remember that grants are additive; if a capability is turned off here, a user might still have it through another group or the Everyone group.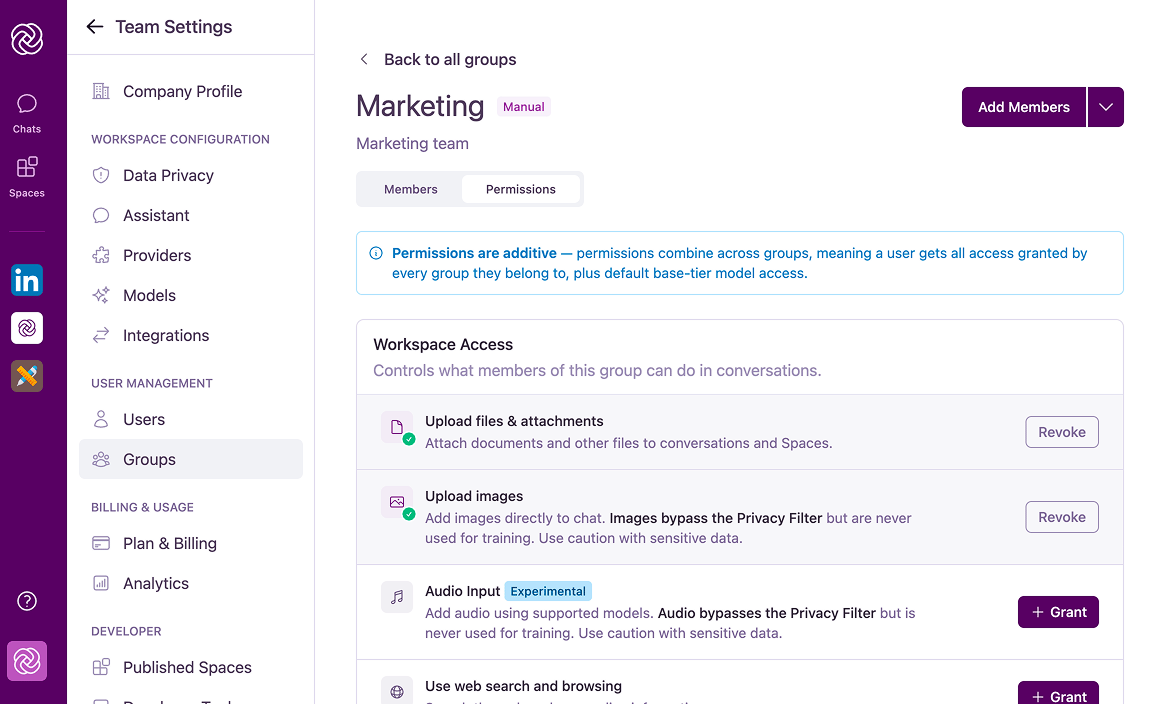
Workspace Access
These permissions control which chat features are available to group members:Upload files & attachments
Allows members to upload documents directly into their chats for analysis.
Upload images
Allows members to add images directly into a chat to support multimodal interactions, such as asking questions about a chart or diagram.
Privacy NoteImages uploaded via this feature do not pass through the Omnifact Privacy Filter™. While images are never used for training by the underlying model provider, any sensitive data contained within the images will be sent directly to the model.Please ensure your users are aware when handling sensitive data.
Audio Input (Experimental)
This experimental feature allows users to add audio files directly into a chat to support multimodal interactions with audio-capable models.
Privacy NoteAudio files uploaded via this feature do not pass through the Omnifact Privacy Filter™. While audio files are never used for training by the underlying model provider, any sensitive data contained within the audio will be sent directly to the model.Please ensure your users are aware when handling sensitive data.
Use web search and browsing
When enabled, this grants the AI the ability to search the internet and browse web pages. This capability is useful for providing up-to-the-minute information and gathering broader context for user queries that cannot be answered by the selected AI model alone.
Generate images
Enabling this feature allows users to transform their ideas into visuals by requesting AI-generated images.
Execute code (Experimental)
Allows the agent to run Python code in a secure sandbox to analyze datasets, calculate numbers, generate charts, and create native Excel, Word, and PowerPoint files.
Security NoteThe code execution sandbox has internet access enabled and can download public packages or datasets. Code execution commands and data sent to the sandbox bypass the Privacy Filter.
Dictate messages (Experimental)
Allows users to speak messages directly in chat to convert voice to text. Audio recordings bypass the Privacy Filter but are never used for model training. Requires Azure OpenAI to be enabled.
Model Access
By default, all users have access to base tier AI models. You can grant access to more capable (and potentially more expensive) models, including premium-tier models like Claude Opus (all versions), GPT-5.5, and Sol. See Model Management for the current list.Organization availability applies: A group permission only works if the specific model or feature is actually enabled for your organization in Models. If your organization has disabled premium models entirely, the group permission will have no effect.
Privacy & Compliance
These settings control data residency and privacy exemptions:- Enable US-hosted models access: Grants access to models hosted on US servers (Data Residency).
- Privacy Filter Exemption: When assigned, this allows group members to disable the Privacy Filter when unmasked data is explicitly required. The bypass setting is remembered individually for the general agent and for each specific Space.
Sharing Spaces with Groups
Instead of inviting users individually to a Space, you can share it with an entire group.- Navigate to your Space and open Space Settings > Sharing.
- Click Share Space.
- Select any of your organization’s groups.